Quick Start Guide
Introduction
The ICMS helps to centralize and simplify document management, as it supports the diverse set of document types used in the operation of the APS facility. This includes routine office files, CAD models and drawings, and web content. You can access the ICMS at https://icmsdocs.aps.anl.gov/docs from any computer on the Argonne domain. VPN is required for off-site access.
This guide describes the most common tasks and provides tips to reduce repetitive work.
Checking In (Uploading) New Documents
Check In is the process of submitting a document to ICMS. During the check in process, you will assign metadata, which is the labeling, cataloging and descriptive information that helps you and others locate the item in the future. Metadata defines what the content is, who can access it, and how it will be used.

To perform a check in, Select New Check In and choose a check in form: Simple, Advanced, or APS Upgrade. Most fields are optional — only a few are required. Some commonly used fields:
- Type: select the closest match for your document.
- Title (the name of your document): be as descriptive as possible!
- Security Group: Use ANL, APS or CNM if you have no specific security requirements. Otherwise select a relevant specialized group, such as CDR or UpgradeTeam.
- Primary File: upload your file (Word .doc, PDF, etc.) here.
- Alternate File: if you have a secondary rendition of your document (such as a PDF), you can upload it here.
- Comments/Keywords: optionally enter comments or other freeform text.
- Document Date: optionally indicate the date the document was created.
- Authors: optionally select the person(s) responsible for the document’s creation. You may search for APS people using the Find button.
Simple Check In
Simple Check In provides the most frequently used metadata fields. Use this option for general purpose check-in.

Advanced Check In
If you need to use workflow or have very specific metadata needs related to drawings, etc, you must use Advanced Check In. Advanced Check In provides numerous additional fields to support specialized documents. For more information about how to use workflow, see the Workflow guide.

APS-U Documents
The APS Upgrade Project uses a custom check in form that provides some specific metadata options for the project:
- Folder: select a subfolder of the APS Upgrade folder.
- Category: optionally select an applicable Category to complement the document type.

Check In an APS-U document within a Contribution Folder
If you are already browsing a Contribution Folder and would like to add a new document, select Actions > New Content. You will be presented with the APS-U Check In Form, but some fields are pre-set. You may adjust any fields as necessary.

Check In a Similar Document

If you have several documents that are mostly identical, using the Check In Similar feature is a good time saver. Within any search results or Content Information page, click the Actions or Content Actions menu and select Check In Similar. You will be presented with a Check In Form that is pre-set with metadata values from the original document. Adjust the values as necessary and select Check In.
Searching for Documents
The ICMS provides several search methods. These include:
- Quick Search (basic keyword searching)
- Complete Metadata Search (searching by metadata criteria)
- Full Text Search (search the actual content of documents)
Complete instructions for search are available in Searching For Documents. The most common type of search is a Quick Search.
Using Quick Search
Quick Search provides a simple way to find information based on common metadata criteria, such as Content ID, Title, and Contributor. The Quick Search box is always available in the upper-right corner of the ICMS interface. To use Quick Search, enter one or more words in the box and select the Quick Search button.
By default, Quick Search will look for documents only (not CAD Models or Drawings). You can refine the Quick Search criteria by selecting the target icon to the left of the Search box. Then pick a criteria.

Revising (Checking Out) Existing Documents
One of the key features for document management is revision control. We recommend that you check in your original source document(s) and use revision control to track changes thereafter. Check Out is the way to start the revision process, and prevent others from revising a document while you are working on it.
Example
You are responsible for maintaining the APS Cyber Security Procedure. This document must be reviewed yearly. First, check in the original version of the procedure. When the procedure review is scheduled, you would search for the document in ICMS, check it out, revise it, and then check in the new revision.
When someone searches for the APS Cyber Security Procedure, the most current version is listed in the Search Results. Older revisions of the document are listed on the Content Information page.
How to Check Out a Document
- Search for and locate the document that you want to revise.
- In the search results, click the actions icon and select the “Check Out” action. You may also do this from the Content Information screen.

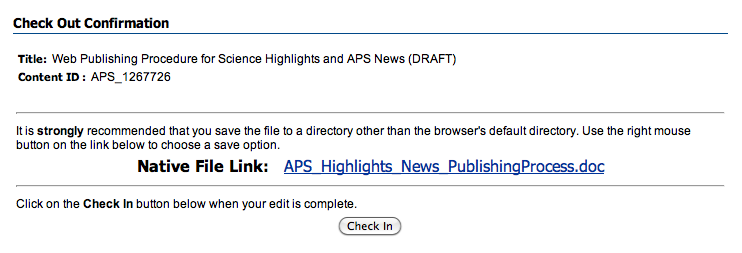
- The Check Out Confirmation page is displayed. It is strongly recommended that you save the file on your PC before editing it. ICMS does not automatically download the file.
- Edit the file.
- Check in the file as a new revision. You can do this two ways:
- If you make all the changes to the file while the Check Out Confirmation page is still displayed, you can check the file in by clicking on the Check In button.
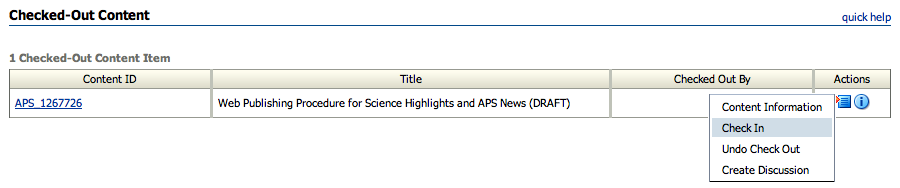
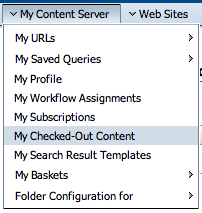
- If you no longer have the Check Out Confirmation page available, click My Content Server and choose My Checked-Out Content. Click the Action icon for the appropriate content item to display a contextual menu and select Check In.
 You can now check in the revised file using the standard procedure to check in a file.