Difference between revisions of "CMPR"
| Line 15: | Line 15: | ||
=== CMPR Windows === | === CMPR Windows === | ||
CMPR launches 2 windows: the main GUI '''Control''' window and the ''' | CMPR launches 2 windows: the main GUI '''Control''' window and the '''Plot''' window. | ||
[[image:cmprintro.png|500px|CMPR Windows]] | [[image:cmprintro.png|500px|CMPR Windows]] | ||
| Line 25: | Line 25: | ||
Left-click with a mouse in the Plot window to define a zoom window, right-click to un-zoom. The key "L" shows/hides a cursor mode to read values from the plot window. | Left-click with a mouse in the '''Plot''' window to define a zoom window, right-click to un-zoom. The key "L" shows/hides a cursor mode to read values from the plot window. | ||
=== Opening files === | === Opening files === | ||
On the ''Read'' tab, first select the file format to be read (1). More formats can be found by scrolling down (red arrow). Navigate to the desired folder or directory (2). Select (hightlight) the file or files to be read (3). Click READ (4) to open the file(s). | On the ''Read'' tab, first select the file format to be read (1). More formats can be found by scrolling down (red arrow). Navigate to the desired folder or directory (2). Select (hightlight) the file or files to be read (3). Click the READ button (4) to open the file(s). | ||
[[image:cmprread.png|500px|CMPR OpeningFiles]] | [[image:cmprread.png|500px|CMPR OpeningFiles]] | ||
Successfully opened files will be listed in the "Datasets Read" panel (1) and will appear in the Plot window (2). | Successfully opened files will be listed in the "Datasets Read" panel (1) and will appear in the '''Plot''' window (2). | ||
[[image:cmpropned.png|500px|CMPR tabs]] | [[image:cmpropned.png|500px|CMPR tabs]] | ||
| Line 42: | Line 42: | ||
=== Plotting === | === Plotting === | ||
By default, the Plot window will | By default, the '''Plot''' window will display the most recently opened file(s). On the '''Control''' window ''Plot'' tab (1), modify which files are plotted. Highlight the desired file(s) (2), then click "Update Plot" (3). One can also change the color or size of the data lines and markers (4), or export the current Plot window contents to a pdf or postscipt image; or to Grace or .csv data outputs (5). | ||
[[image:cmprplottab.png|500px|CMPR plot window]] | [[image:cmprplottab.png|500px|CMPR plot window]] | ||
Revision as of 22:03, 13 December 2011
About CMPR
CMPR is a free multipurpose program for powder diffraction data.
11-BM staff routinely use it to examine & compare (CoMPaRe) powder XRD data at the beamline. It is a great too for manipulating and converting multiple datasets, and can also be used to fit or index diffraction peaks.
The program works well with 11-BM's .fxye GSAS format, but can be used with nearly any powder XRD data.
See the CMPR subversion page for download links, installation notes, and full documentation. ( https://subversion.xor.aps.anl.gov/trac/CMPR/wiki)
Getting Started
CMPR Windows
CMPR launches 2 windows: the main GUI Control window and the Plot window.
Functions on the Control window are organized into multiple menu tabs. For example, the Read new file tab is highlighted below. You may need to expand the GUI window to see all tabs at once.
Left-click with a mouse in the Plot window to define a zoom window, right-click to un-zoom. The key "L" shows/hides a cursor mode to read values from the plot window.
Opening files
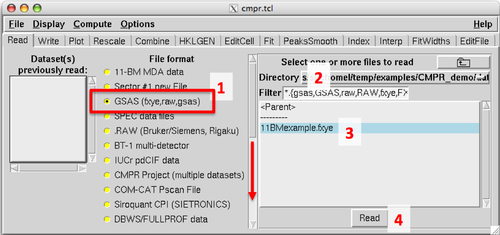
On the Read tab, first select the file format to be read (1). More formats can be found by scrolling down (red arrow). Navigate to the desired folder or directory (2). Select (hightlight) the file or files to be read (3). Click the READ button (4) to open the file(s).
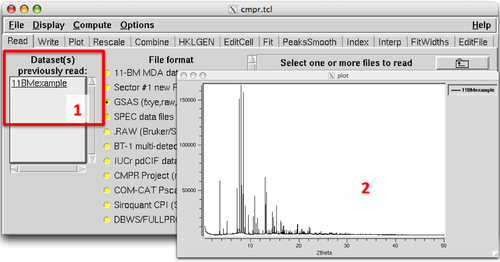
Successfully opened files will be listed in the "Datasets Read" panel (1) and will appear in the Plot window (2).
Plotting
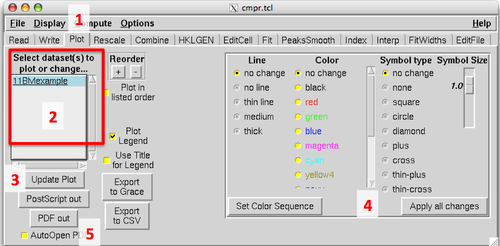
By default, the Plot window will display the most recently opened file(s). On the Control window Plot tab (1), modify which files are plotted. Highlight the desired file(s) (2), then click "Update Plot" (3). One can also change the color or size of the data lines and markers (4), or export the current Plot window contents to a pdf or postscipt image; or to Grace or .csv data outputs (5).


